お久しぶりです!
クロスマート株式会社では主にフロントエンドのタスクを勉強させていただきつつ、スクラムマスター的なことをざっくり担当しております。ナイスガイの福留です。 この記事を読んでいただいている方は、タイトルで全てを察していただいていると思いますので、変な前口上は省きます。 また以下から弊社のエンジニアチームによって投稿している記事一覧が閲覧可能です。 xmart-techblog.hatenablog.com
xmart-techblog.hatenablog.com
xmart-techblog.hatenablog.com Click!! Me!! まず、今回NuxtBridgeからNuxt3への移行をおこなったシステムは顧客用のダッシュボード機能のフロントエンド(APIサーバーはDRFで動いています)です。 本番環境と別に検証環境を用意し常にその二つが動いています。 今回では、② の手順にフォーカスした手順を記載します。 Nuxt3 移行では、Health チェック用に作成した app.vue で以下のような実装を行い動作を検証する Nuxt3 移行では、Health チェック用に作成した app.vue で以下のような実装を行い動作を検証する Nuxt2 では VeeValidate の 3 系を使用していた 使用例 Nuxt3(Vue3)では VeeValidate の 4 系を採用する app.vue で最低限のバリデーションチェックを行う(カスタムルール等の動作確認は既存実装の移行時に行う) 既存の VeeValidate を削除 多言語用モジュール、ルールのプリセットを依存関係に追加 VeeValidate 用のプラグインを作成する app.vue で最低限のバリデーションが可能なことを検証 app.vue に追加するコード例 Nuxt3 では 設定ファイルに以下を更新する 最低限の動作検証を行えるログイン画面を作成する これにより、Cookie 中 (リフレッシュトークンは useAuth だけでなく、useAuthState composables も提供されており、useAuth().signIn()を発火させなくてもトークンのセットと session の取得が可能 (サーバーミドルウェア等を使用しないため、client でのみ発生したエラーをロギングする) 設定ファイルに以下を更新する nuxt.config.ts プラグインを実装する plugins/sentry.client.ts 意図的にエラーが発生するコードを実行し、sentry にロギングされていることを確認する (今回は SPA モードのため、SSR に対応した方法ではない可能性があるため注意) bootstrap5, bootstrap-vue-30.5 系を使用した場合 *bootstrap-vue-3 は非推奨となっており、bootstrap-vue-next に PJ は移行されている https://bootstrap-vue-next.github.io/bootstrap-vue-next/docs.html#installation-nuxt-js-3 https://vue-chartjs.org/guide/#introduction HorizontalBar の実装 https://www.npmjs.com/package/vue3-datepicker-ja 同様に Nuxt3 非対応であるため、vue3 用の gtm ライブラリを活用する 最後まで読んでいただいて、ありがとうございました! 弊社ではバックエンド、フロントエンドエンジニアの方を募集しています。 社員を第一に考える、とても働きやすくチャレンジしやすい・スキルを上げながら働くことの出来る会社です。 クロスマート株式会社について気になった方がいらっしゃいましたら、以下のリンクから「話を聞きに行きたい」をお願いします!
はじめに

前提
ダッシュボード Nuxt3 移行
Nuxt3 実施前
package.json
{
  "name": "xxx",
  "version": "1.0.0",
  "private": true,
  "scripts": {
    "dev": "nuxi dev",
    "build": "nuxt generate",
    "start": "nuxi preview",
    "lint:js": "eslint --ext \".js,.ts,.vue\" --ignore-path .gitignore .",
    "lint:style": "stylelint \"**/*.{css,scss,sass,vue}\" --ignore-path .gitignore",
    "lint:prettier": "prettier --check .",
    "lint": "yarn lint:js && yarn lint:style && yarn lint:prettier",
    "lintfix": "prettier --write --list-different . && yarn lint:js --fix && yarn lint:style --fix",
    "test": "jest"
  },
  "lint-staged": {
    "*.{js,jsx,ts,vue}": "yarn lint",
    "*.{css,scss}": "yarn lint:style"
  },
  "husky": {
    "hooks": {
      "pre-commit": "lint-staged"
    }
  },
  "dependencies": {
    "@nuxtjs/auth-next": "^5.0.0-1667386184.dfbbb54",
    "@nuxtjs/axios": "^5.13.6",
    "@nuxtjs/gtm": "^2.4.0",
    "@nuxtjs/sentry": "^7.3.1",
    "axios-extensions": "^3.1.6",
    "bignumber.js": "^9.1.1",
    "bootstrap": "^4.6.2",
    "bootstrap-vue": "^2.22.0",
    "chart.js": "^2",
    "chartjs-plugin-datalabels": "^0.7.0",
    "core-js": "^3.25.3",
    "date-fns": "^2.30.0",
    "normalize.css": "^8.0.1",
    "nuxt": "^2.15.8",
    "pinia": "^2.1.3",
    "querystring": "^0.2.1",
    "vee-validate": "3",
    "vue": "^2.7.10",
    "vue-chartjs": "^3.5.1",
    "vue-date-pick": "^1.5.1",
    "vue-server-renderer": "^2.7.10",
    "vue-template-compiler": "^2.7.10"
  },
  "devDependencies": {
    "@babel/eslint-parser": "^7.19.1",
    "@nuxt/bridge": "npm:@nuxt/bridge-edge",
    "@nuxt/types": "^2.15.8",
    "@nuxt/typescript-build": "^2.1.0",
    "@nuxtjs/eslint-config-typescript": "^11.0.0",
    "@nuxtjs/eslint-module": "^3.1.0",
    "@nuxtjs/localforage": "^1.1.0",
    "@nuxtjs/style-resources": "^1.2.1",
    "@nuxtjs/stylelint-module": "^4.1.0",
    "@pinia/nuxt": "^0.4.11",
    "@sentry/webpack-plugin": "1",
    "@types/bignumber.js": "^5.0.0",
    "babel-core": "7.0.0-bridge.0",
    "babel-jest": "^29.1.2",
    "eslint": "^8.24.0",
    "eslint-config-prettier": "^8.5.0",
    "eslint-plugin-jest": "^27.0.4",
    "eslint-plugin-nuxt": "^4.0.0",
    "eslint-plugin-vue": "^9.5.1",
    "husky": "^8.0.3",
    "jest": "^29.1.2",
    "jest-environment-jsdom": "^29.1.2",
    "lint-staged": "^13.0.3",
    "nuxt-edge": "^2.17.0-28091539.0fbba29",
    "postcss-html": "^1.5.0",
    "prettier": "^2.8.8",
    "sass": "^1.54.0",
    "sass-loader": "10",
    "stylelint": "^14.13.0",
    "stylelint-config-prettier": "^9.0.3",
    "stylelint-config-recommended-vue": "^1.4.0",
    "stylelint-config-standard": "^28.0.0"
  }
}
nuxt.config.js
import { defineNuxtConfig } from "@nuxt/bridge";

export default defineNuxtConfig({
  target: "static",
  ssr: false,
  bridge: {
    nitro: process.env.XXX === "local",
  },

  // Global CSS: https://go.nuxtjs.dev/config-css
  css: ["normalize.css", { src: "~/assets/css/app.scss", lang: "scss" }],

  // Plugins to run before rendering page: https://go.nuxtjs.dev/config-plugins
  plugins: ["~/plugins/vee-validate", "~/plugins/axios"],

  // Auto import components: https://go.nuxtjs.dev/config-components
  components: true,

  // Modules for dev and build (recommended): https://go.nuxtjs.dev/config-modules
  buildModules: [
    // https://go.nuxtjs.dev/stylelint
    "@nuxtjs/stylelint-module",
    "@pinia/nuxt",
  ],

  // Modules: https://go.nuxtjs.dev/config-modules
  modules: [
    "@nuxtjs/axios",
    // https://go.nuxtjs.dev/bootstrap
    "bootstrap-vue/nuxt",
    "@nuxtjs/auth-next",
    "@nuxtjs/style-resources",
    "@nuxtjs/localforage",
    "@nuxtjs/sentry",
    "@nuxtjs/gtm",
  ],

  // Axios module configuration: https://go.nuxtjs.dev/config-axios
  axios: {
    // Workaround to avoid enforcing hard-coded localhost:3000: https://github.com/nuxt-community/axios-module/issues/308
    baseURL: process.env.API_URL,
  },

  router: {
    middleware: ["auth"],
  },
  auth: {
    localStorage: false,
    redirect: {
      ...
    },
    strategies: {
      local: {
        token: {
          property: "xxx",
        },
        refreshToken: {
          property: "xxx",
          data: "xxx",
        },
        endpoints: {
          login: {
            ...
          },
          refresh: {
            ...
          },
          user: {
            ...
          },
        },
      },
    },
    cookie: {
      options: {
        ...
      },
    },
  },

  publicRuntimeConfig: {
    ...
  },

  // Build Configuration: https://go.nuxtjs.dev/config-build
  build: {
    transpile: ["vee-validate/dist/rules"],
  },
  styleResources: {
    scss: [
      "~assets/css/bootstrap-resources.scss",
    ],
  },

  gtm: {
    ...
  },

  sentry: {
    publishRelease: {
      ...
    },
    config: {
      ...
    },
  },
});
ブランチ戦略
master
  ↑ リリース用ブランチ
    ↑ ① まずNuxt本体のアップデートブランチをリリース用ブランチにマージ
    ↑ ② 次に、各featureブランチをリリース用ブランチにマージしていく(作業はある程度並行して出来る想定)
      @nuxt/devtoolsの無効制御
      API通信用のcomposableの作成
      環境変数の設定
      バリデーションライブラリの追加
      Bootstrap, BootstrapVueの追加
      Sentry実装
      リビジョンチェック実装
      認証系の実装
      Chart.js追加
      Gtag埋め込み
    ↑ ③ 既存実装の置換を実施
    ↑ ④ デフォルトブランチとの差分の吸収
Nuxt3 移行手順
Nuxt 本体のアップデート
$ npx nuxi upgrade
“nuxt”: “^2.15.8” → "nuxt": "^3.9.3"$ yarn remove vue @nuxt/bridge nuxt-edge vue-server-renderer vue-template-compiler webpackcomponents, store, middleware, types, pages, layoutsあたりを一時的に_oldに退避nuxt.config.jsをnuxt.config.tsに置換
target: staticを削除devServer: { host: ‘0.0.0.0’, port: xxx }の設定を追加
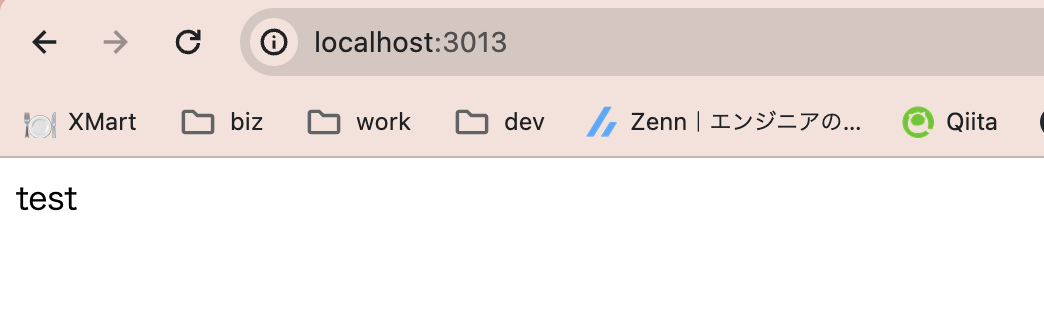
$ yarn devapp.vueの内容が正常に表示されることを確認
"extends": "./.nuxt/tsconfig.json",をトップレベルに追記compilerOptions.typesから@nuxt/types, "@nuxtjs/axios”, "@nuxtjs/auth-next”あたりを削除しておく@nuxt/devtools の無効化制御
  devtools: {
    enabled: process.env.xxx !== 'production',
  },
API 通信用の composable の作成
@nuxt/http, @nuxtjs/axiosが使用出来なくなり、fetchAPI, 独自開発のunjs/ofetchのヘルパー関数($fetch)が推奨されている/composables/useHttpsClient.tsとして作成する type RequestOptions = {
responseType?: "json" | "text" | "blob" | "arrayBuffer";
headers?: HeadersInit;
params?: { [key: string]: string | number };
};
type Data = { [key: string]: any };
const runtimeConfig = useRuntimeConfig();
export const useHttpClient = () => {
const api = $fetch.create<Response>({
baseURL: runtimeConfig.public.API_URL,
});
// @sidebase/nuxt-authを使用し、JWT認証を行う場合、認証トークンはCookie中 auth:token として保存される
const accessToken = useCookie("auth:token") as Ref<string>;
/**
*
* @param headers
* @returns HeadersInit
*/
const generateHeaders = (headers: HeadersInit = {}): HeadersInit => {
return {
Authorization: `Bearer ${accessToken.value}`,
...headers,
};
};
const $get = <T = any>(
url: string,
options: RequestOptions = {}
): Promise<T> => {
options.headers = generateHeaders(options.headers);
options.responseType = options.responseType || "json";
return api(url, { method: "GET", ...options });
};
const $post = async <T = any>(
url: string,
data?: Data,
options: RequestOptions = {}
): Promise<T> => {
options.headers = generateHeaders(options.headers);
options.responseType = options.responseType || "json";
return api(url, {
method: "POST",
body: data,
...options,
});
};
const $put = async <T = any>(
url: string,
data?: Data,
options: RequestOptions = {}
): Promise<T> => {
options.headers = generateHeaders(options.headers);
options.responseType = options.responseType || "json";
return api(url, {
method: "PUT",
body: data,
...options,
});
};
const $patch = <T = any>(
url: string,
data?: Data,
options: RequestOptions = {}
): Promise<T> => {
options.headers = generateHeaders(options.headers);
options.responseType = options.responseType || "json";
return api(url, {
method: "PATCH",
body: data,
...options,
});
};
const $delete = <T = any>(
url: string,
data?: Data,
options: RequestOptions = {}
): Promise<T> => {
options.headers = generateHeaders(options.headers);
options.responseType = options.responseType || "json";
return api(url, {
method: "DELETE",
body: data,
...options,
});
};
return { $get, $post, $put, $patch, $delete };
};
  import { defineStore } from "pinia";
  import { Actions, State } from "~/types/store/example";
  const { $get } = useHttpClient();

  export const useExampleStore = defineStore<"example", State, {}, Actions>(
    "example",
    {
      state: () => ({
        text: "",
      }),
      actions: {
        async getExample() {
          const data = await $get<string>(`/sample-text`, {
            params: { id: 1 },
          });
          this.text = data;
        },
      },
    }
  );
<script setup lang="ts">
const { $get } = useHttpClient();

const todoList = ref([]);
onMounted(() => {
  // 検証用にbaseURLはhttps://jsonplaceholder.typicode.com等の適当なjsonを返すオープンなAPIを指定
  $get<{ userId: number; id: number; title: string; body: string }[]>(
    "/posts"
  ).then((res) => {
    todoList.value = res;
  });
});
</script>

<template>
  <div>
    <div>todoList (useHttpClient.$get)</div>
    <ul>
      <li v-for="item in todoList" :key="item.id">{{ item.title }}</li>
    </ul>
  </div>
</template>
環境変数の設定
publicRuntimeConfigではなく、runtimeConfig.publicに値をセットする事となったruntimeConfigにそのまま環境変数をセットした場合、サーバーサイドでのみ使用可能)app.config.tsを配置しuseAppConfig()から環境変数を使用する事も出来るが、クライアントのコードにバンドルされるため、機密性の高い情報を使用する場合はruntimeConfigを推奨するruntimeConfig: {
public: {
API_URL: xxx;
}
}
<script setup lang="ts">
const runtimeConfig = useRuntimeConfig();
const { API_URL } = runtimeConfig.public;
</script>

<template>
  <div>
    <div>API_URL: {{ API_URL }}</div>
  </div>
</template>
バリデーションライブラリの追加
    <ValidationObserver v-slot="{ invalid }">
      <b-form @submit.prevent="submit">
        <ValidationProvider
          v-slot="{ errors, valid, validated }"
          rules="required|email"
          name="メールアドレス"
        >
          <b-form-group
            :state="validated ? valid : null"
            :invalid-feedback="errors[0]"
            label="メールアドレス"
            label-for="login-email"
          >
            <b-form-input
              id="login-email"
              v-model="loginForm.email"
              :state="validated ? valid : null"
              name="email"
              type="email"
              placeholder="メールアドレス"
            />
          </b-form-group>
        </ValidationProvider>
vee-validate.useForm composable、zod, yup等のライブラリを使用してのバリデーションを推奨している。
$ yarn remove vee-validate
$ yarn add vee-validate
$ yarn add -D @vee-validate/i18n @vee-validate/rules
plugins/vee-validate.client.tsimport { localize, setLocale } from "@vee-validate/i18n";
import ja from "@vee-validate/i18n/dist/locale/ja.json";
import {
required,
email,
confirmed,
max,
numeric,
digits,
} from "@vee-validate/rules";
import {
defineRule,
configure,
Form,
Field,
ErrorMessage,
} from "vee-validate";
export default defineNuxtPlugin((nuxtApp) => {
setLocale("ja");
configure({
generateMessage: localize({
ja,
}),
});
// コンポーネントで使用するルールを注入する
defineRule("required", required);
defineRule("email", email);
defineRule("confirmed", confirmed);
defineRule("max", max);
defineRule("numeric", numeric);
defineRule("digits", digits);
// カスタムルールの作成
defineRule("hankaku_only", (value: string, _, { field }) => {
if (String(value).match(/^[A-Z0-9a-z&',・\-\?\.\s]*$/)) {
return true;
}
return `${field}は半角数英数字、記号(「-」「&」「’」「,」「?」「.」「・」)で入力してください`;
});
defineRule("kana", (value: string, _, { field }) => {
if (String(value).match(/^[ァ-ンァ-ン゙゚\-ー]*$/)) {
return true;
}
return `${field}はカタカナで入力してください`;
});
nuxtApp.vueApp.component("ValidationForm", Form);
nuxtApp.vueApp.component("ValidationField", Field);
nuxtApp.vueApp.component("ValidationErrorMessage", ErrorMessage);
});
// VeeValidateの型定義を拡張
declare module "@vue/runtime-core" {
export interface GlobalComponents {
ValidationForm: typeof Form;
ValidationField: typeof Field;
ValidationErrorMessage: typeof ErrorMessage;
}
}
<div>
  <h2>Validation</h2>
  <ValidationForm as="div">
    <label for="test">required</label>
    <ValidationField type="input" name="required" rules="required" />
    <ValidationErrorMessage name="required" v-slot="{ message }">
      {{ message }}
    </ValidationErrorMessage>
  </ValidationForm>
</div>
認証系の実装
@nuxtjs/auth-nextを使用していた@nuxtjs/auth-nextを使用できないため、(Nuxt 公式から認証系ライブラリが 2024/1 現在リリースされていない)Auth.js のリリースしている@sidebase/nuxt-authを使用する$ yarn remove @nuxtjs/auth-next$ yarn add @sidebase/nuxt-auth
nuxt.config.ts modules: [(... →を追加),'@sidebase/nuxt-auth'],
auth: {
provider: {
type: 'refresh',
pages: {
login: '/...',
},
endpoints: {
signIn: { path: '...', method: '...' },
signOut: { path: '...', method: '...' },
getSession: { path: '...', method: '...' },
refresh: { path: '...', method: '...' },
},
token: {
signInResponseTokenPointer: '...',
},
refreshToken: {
signInResponseRefreshTokenPointer: '...',
},
sessionDataType: { id: 'string', email: 'string' },
},
globalAppMiddleware: true,
// process.env.API_URLだけだとprocess.env.API_URL/api/authにアクセスしようとする癖に、なぜかprocess.env.API_URL/まで含めるとfullBaseUrlとして正しく認識される
baseURL: `${process.env.API_URL}/`,
},
pages/login.vue<script lang="ts" setup>
const { signIn, token, data, status } = useAuth();
definePageMeta({
auth: {
unauthenticatedOnly: true,
navigateAuthenticatedTo: "/",
},
});
const email = ref("");
const password = ref("");
</script>
<template>
<div>
<h1>Login Page</h1>
<pre>Status: {{ status }}</pre>
<pre>
Data: {{ data || "no session data present, are you logged in?" }}</pre
>
<pre>
JWT token: {{ token || "no token present, are you logged in?" }}</pre
>
<form
@submit.prevent="
signIn({ email, password }, { callbackUrl: '/' }).catch(
(e: Error) => console.warn(e)
)
"
>
<input v-model="email" type="text" placeholder="email" />
<input v-model="password" type="password" placeholder="Password" />
<button type="submit">sign in</button>
</form>
</div>
</template>
auth._token.localに保存されていたトークンがauth:tokenに保存されるようになるauth._refresh_token.localからauth:refresh-tokenとなる)
signIn()の実行を挟まないトークンのセットとセッションの取得の例definePageMeta({
auth: {
unauthenticatedOnly: true,
},
});
const router = useRouter();
const route = useRoute();
const { status, getSession } = useAuth();
const { setToken } = useAuthState();
onMounted(async () => {
// tokenはBearerを含むため、取り除く
const token = route.query.token.replace("Bearer ", "") as string;
setToken(token);
await getSession();
if (status.value === "unauthenticated") {
alert("ログインに失敗しました");
} else {
router.push("/");
}
});
Sentry 実装
@nuxtjs/sentryを使用していた$ yarn remove @nuxtjs/sentry$ yarn add @sentry/vue
  // 既存部分のruntimeConfig
  runtimeConfig: {
    public: {
      ...,
      SENTRY_ENVIRONMENT: process.env.xxx || 'local',
      SENTRY_DSN: process.env.xxx || 'dummy',
    },
  },

  // sourcemapの設定
  sourcemap: {
    client: true,
  },
import * as Sentry from "@sentry/vue";

export default defineNuxtPlugin(({ vueApp }) => {
  const config = useRuntimeConfig();
  const environment = config.public.SENTRY_ENVIRONMENT as
    | "local"
    | "production"
    | "staging";
  const projectUrl = config.public.PROJECT_URL as string;
  const dsn = config.public.SENTRY_DSN as string;

  const router = useRouter();

  Sentry.init({
    app: [vueApp],
    dsn,
    environment,
    integrations: [
      // 7.84系あたりの場合
      new Sentry.BrowserTracing({
        tracingOrigins: [projectUrl],
        routingInstrumentation: Sentry.vueRouterInstrumentation(router),
      }),
      new Sentry.Replay({
        maskAllText: true,
        blockAllMedia: true,
      }),

      // 7.10x系あたり以降の場合は、Sentry.BrowserTrancing, Replayが非推奨なので以下
      Sentry.browserTracingIntegration({ router }),
      Sentry.replayIntegration(),
    ],
    tracesSampleRate: 1.0,
    replaysSessionSampleRate: 1.0,
    replaysOnErrorSampleRate: 1.0,
  });
});
Bootstrap, BootstrapVue 導入
"bootstrap": "^4.6.2",
"bootstrap-vue": "^2.22.0",
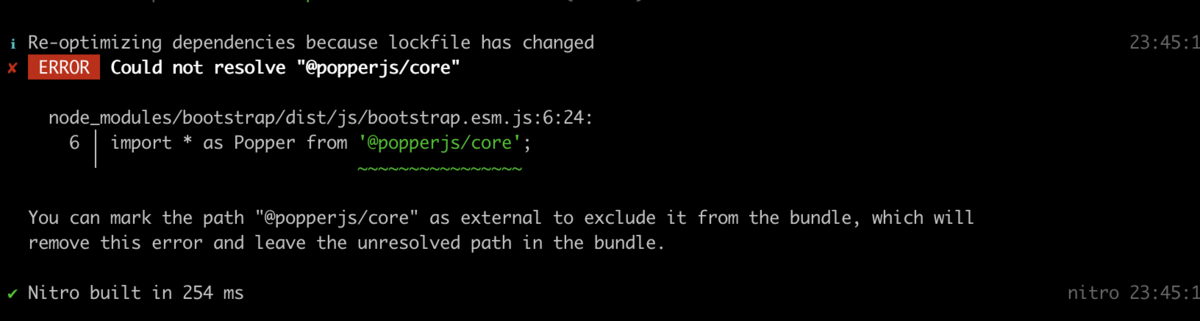
$ yarn remove boostrap bootstrap-vue$ yarn add bootstrap bootstrap-vue-next @bootstrap-vue-next/nuxt -D modules: ['@bootstrap-vue-next/nuxt'],
css: ['bootstrap/dist/css/bootstrap.min.css'],
bootstrapのutil class、bootstrap-vue-nextのcomponentを使用した UI を実装する <div class="m-2">
<b-button @click="modal = !modal">test</b-button>
<b-modal v-model="modal">test</b-modal>
</div>
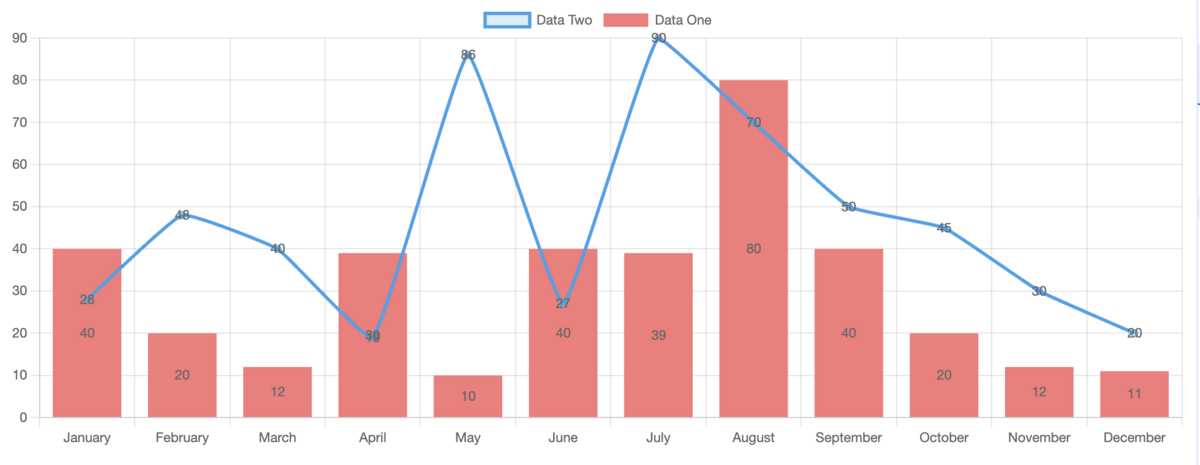
Chart.js 追加
Chart.js^4及びvue-chartjs^5は ESM 専用とのことchartjs-plugin-datalabels)を運用可能である必要があるChart.js^4, vue-chartjs^5での実装
chartjs-plugin-datalabels の next の 2 系のを導入
$ yarn add chartjs-plugin-datalabels@next -D "chart.js": "^4.0.0",
"vue-chartjs": "^5.0.0",
...
"chartjs-plugin-datalabels": "^2.0.0-rc.1",
  <script setup lang="ts">
  import {
    BarElement,
    CategoryScale,
    ChartData,
    Chart as ChartJS,
    Legend,
    LineElement,
    LinearScale,
    PointElement,
    Title,
    Tooltip,
  } from "chart.js";
  import chartPluginDataLabels from "chartjs-plugin-datalabels";
  import { Bar } from "vue-chartjs";

  ChartJS.register(
    CategoryScale,
    LinearScale,
    BarElement,
    LineElement,
    PointElement,
    Title,
    Tooltip,
    Legend,
    chartPluginDataLabels
  );

  const data = ref<
    ChartData<"bar", (number | [number, number] | null)[], unknown>
  >({
    labels: [
      "January",
      "February",
      "March",
      "April",
      "May",
      "June",
      "July",
      "August",
      "September",
      "October",
      "November",
      "December",
    ],
    datasets: [
      {
        label: "Data Two",
        backgroundColor: "rgba(54, 162, 235, 0.2)",
        borderColor: "rgb(54, 162, 235)",
        data: [28, 48, 40, 19, 86, 27, 90, 70, 50, 45, 30, 20],
        // Chart.jsの型定義では複合グラフの定義ができないため、@ts-ignoreで型エラーを無視
        // @ts-ignore
        type: "line",
        fill: false,
        tension: 0.1,
      },
      {
        type: "bar",
        label: "Data One",
        backgroundColor: "#f87979",
        data: [40, 20, 12, 39, 10, 40, 39, 80, 40, 20, 12, 11],
      },
    ],
  });

  const options = ref({
    responsive: true,
    maintainAspectRatio: false,
  });
  </script>

  <template>
    <div style="height: 400px; position: relative">
      <Bar :data="data" :options="options" />
    </div>
  </template>
vue-chartjs^4系以降、それまで存在したHorizontalBarが削除されている// ⭐️ ここを追加 によって既存の Bar を拡張し、縦表示の棒グラフに変更可能<script setup lang="ts">
import {
BarElement,
CategoryScale,
ChartData,
Chart as ChartJS,
Legend,
LineElement,
LinearScale,
PointElement,
Title,
Tooltip,
} from "chart.js";
import { Bar } from "vue-chartjs";
ChartJS.register(
CategoryScale,
LinearScale,
BarElement,
LineElement,
PointElement,
Title,
Tooltip,
Legend
);
const data = ref<
ChartData<"bar", (number | [number, number] | null)[], unknown>
>({
labels: [
"January",
"February",
"March",
"April",
"May",
"June",
"July",
"August",
"September",
"October",
"November",
"December",
],
datasets: [
{
label: "Data Two",
backgroundColor: "rgba(54, 162, 235, 0.2)",
borderColor: "rgb(54, 162, 235)",
data: [28, 48, 40, 19, 86, 27, 90, 70, 50, 45, 30, 20],
// Chart.jsの型定義では複合グラフの定義ができないため、@ts-ignoreで型エラーを無視
// @ts-ignore
type: "line",
fill: false,
tension: 0.1,
},
{
type: "bar",
label: "Data One",
// ⭐️ ここを追加
axis: "y",
backgroundColor: "#f87979",
data: [40, 20, 12, 39, 10, 40, 39, 80, 40, 20, 12, 11],
},
],
});
const options = ref({
responsive: true,
maintainAspectRatio: false,
// ⭐️ ここを追加
indexAxis: "y",
});
</script>
<template>
<div style="height: 400px; position: relative">
<Bar :data="data" :options="options" />
</div>
</template>
DatePicker 対応
"vue-date-pick": "^1.5.1"
G タグ埋め込み
@nuxtjs/gtmを使用していた$ yarn remove @nuxtjs/gtm$ yarn add vue-gtag -Dplugins/vue-gtag.client.tsを作成するimport VueGtag from "vue-gtag";
export default defineNuxtPlugin(({ vueApp }) => {
const router = useRouter();
const runtimeConfig = useRuntimeConfig();
const { XXX, GTAG_ID } = runtimeConfig.public;
vueApp.use(
VueGtag,
{
appName: "xxx",
pageTrackerScreenviewEnabled: XXX !== "local",
config: { id: GTAG_ID },
},
router
);
});
最後に